Select a server and start the installation process
Once all system servers are added to the project tree, you can select a server, one at a time, and install the hotfixes relevant to that server. Repeat this procedure for each server in the project tree. No need to wait for each installation to complete.
Procedure
-
From the project tree, select a server that is ready for installation
 , and click Next.
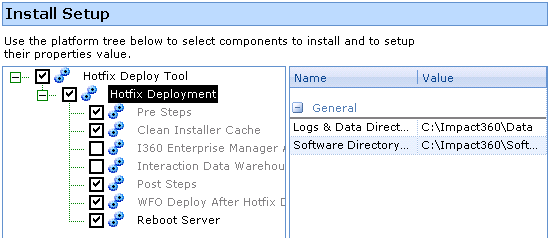
The Install Setup window is displayed. The gray items are not selectable.
-
If you do not want to reboot the server immediately after the hotfixes installation, clear the Reboot Server option. Reboot the server manually for the update to take effect.
-
In the Install Setup window, click Next.
Once the validation is completed without any warnings and the Final Check window appears.
-
Click Next.
-
After validating the components in the Final Check window, click Next.
-
If a Prerequisite/Dependency Error message opens, follow the instructions included in the message.
-
Select the required options to configure the install process.
Display a prompt before restarting the target machine is the default option.
Clear this check box if you do not want to display a prompt for every restart during installation.
-
Set log level to DEBUG mode.
This option is selected by default and enables debug mode for the installation log, which is useful for troubleshooting.
Clear this check box if you do not want to enable debug mode.
-
In the Report area, select the check box to create a platform settings report, and then click Browse to find a location on the network where the report file will be generated.
The structure of the default file name is IP_platformName_date.html.
-
Click Install to start the installation process.