Firewall Scanner
The Firewall Scanner scans ports on multiple servers and provides a detailed ports configuration report.
To learn about the communication ports required between the servers, the Firewall Scanner uses the Firewall Ports Excel document and the platform type of the target servers.
The scanner automatically learns about all the ports communication required between the servers using their platform type.
Before you begin
Windows remoting must be enabled on all the required servers, so that the scanner can learn about the required port state of the remote server, and create listeners for ports that do not have any listeners.
The listeners are created temporarily for scanning, and are removed once the scan is completed.
Procedure
-
From the main page or Tools menu, select Firewall Scan.
-
From the servers tree, select the servers you want to participate in the scan. Make sure all the servers have active connections.
-
Click the type dropdown and select the Type :
-
Default reads the ports Sheet
-
Custom reads the Sheets that are dynamically created by the Customize lab
-
Hybrid reads the mixed site (V11.1, V15.1) sheet, and functions on Hybrid mode (both directions).
-
-
If you selected Hybrid, change the version by clicking on the version dropdown and select the relevant version (Default, 11.1 Site 15.2 DC, 15.2 DC to 11.1 Site).
-
Add the Firewall Ports Excel file by clicking on
 (the Excel icon).
 -
Click on
 (the Add icon).
 -
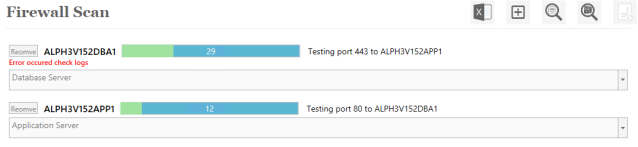
If the scanner is unable to determine the server type, select or type the type of server.
-
To scan the status of all required ports on remote server, click on
 (the Scan Port icon).
 -
To start a full scan of the selected servers, click on
 (the Full Scan icon).
 -
Once the scan is completed, a message to create a report appears. To create the report, click OK.
Once the correct file is added, the ![]() (Ddd icon) is enabled.
(Ddd icon) is enabled.
The selected servers are added, and the scanner learns about the type of each server.